Deploying My Blog to Google Cloud Run
For the past few years, this blog has been hosted on a personal Kubernetes cluster. In addition to my blog, I used the cluster to host a few other websites, as well as run occasional compute jobs. Kubernetes is a great, very flexible technology, and since (full disclosure) I work at Google, throwing container images at a server infrastructure feels very natural to me. But maintaining a Kubernetes cluster means paying for the VMs, and lately I’ve been wondering if I can avoid those costs.
So I started to move my sites and my jobs off Kubernetes, and finally, a month ago, I was able to turn down the cluster completely. I migrated this blog to Cloud Run, a container-based serverless environment that Google introduced in April. It’s been working perfectly so far, and since it fits easily into the free tier, my costs have gone down to effectively zero. And I know that if I ever get slashdotted… this is Google: they’ll scale me up as needed.
In this article, I’ll discuss whether a serverless platform might be a good fit for a static site. Then I’ll provide a tutorial for deploying a Jekyll-based static site to Cloud Run. Along the way you’ll also learn some good practices for containerizing static sites. It shouldn’t be too difficult to adapt these instructions for other static site generators such as Hugo.
Why serverless for static sites?
These days we have a number of choices for hosting static sites. One of the easiest is to use a cloud storage service such as Amazon S3 or Google Cloud Storage. Just upload your static content to a storage bucket, configure a few knobs, and you have a website. Source control services such as GitHub and Bitbucket also often provide web hosting for content pushed to their repositories. For simple static sites, options such as these are generally straightforward and inexpensive.
With the advent of the serverless cloud, we now have a third inexpensive option. With many serverless platforms, you don’t pay for containers or VMs or storage—just the compute resources that you actually use. And for a static site, you don’t use very much.
But still, why choose a general-purpose serverless platform over storage-based or source control hosting?
Different deployment options always have pros and cons. One of the chief benefits of general-purpose serverless, however, is flexibility. Static sites are almost never “purely” static. Maybe you need custom error handling and error documents. Maybe you need more sophisticated redirects. Maybe you need to hide some content behind authentication. Maybe the majority of your site is static, but you still need server-side scripts for a few cases. Simple content-based hosting generally provides some configuration knobs to help with these extras, but they can’t always handle every case.
In my blog, I have a large number of redirects, and a few special cases handled by specially crafted Nginx configuration. So for me, one of the big draws of Google Cloud Run was the ability to provide my own container with my own Nginx config files.
There’s of course no one size that fits all. But if you’re having trouble getting S3 to handle your site the way you need, or if you’re currently running on VMs or on your own servers and want to cut costs, a serverless platform might be your sweet spot as well.
Jekyll on Cloud Run
The rest of this article is a tutorial for deploying a Jekyll-based site to Google Cloud Run. Cloud Run is particularly effective for static sites because it uses containers, letting you configure your own web server for static content. (In contrast, “function” or “lambda” based platforms are typically tailored for specific dynamic web languages or frameworks, and might not support static sites at all.)
Note that there are two “flavors” of Cloud Run: a fully-managed flavor that runs directly in Google’s infrastructure, and a flavor that runs on your own Kubernetes Engine cluster. For static sites, you will probably prefer the former, because it’s the one that gives you the very cheap pay-per-use model. (And in my case, part of the whole purpose was to get rid of my Kubernetes cluster.) However, it’s still easy to adapt these instructions to deploy to Cloud Run on GKE if you want more control over the infrastructure. This video has additional info on the differences between the two Cloud Run flavors.
Jekyll is written in Ruby. I’ll assume you already have Ruby and Jekyll installed, but if you need help, the Jekyll documentation has detailed instructions.
Creating and testing a Jekyll project
We’ll start by creating a new Jekyll project. (If you have an existing project, feel free to use it instead.)
$ jekyll new mysite
$ cd mysite
Now to run your site locally:
$ bundle exec jekyll serveJekyll will build your site locally and serve it on port 4000. Point your web browser to localhost:4000 to see.
You can edit your site by editing posts in the _posts directory, or by making changes to the configuration and layouts. As you make changes, jekyll serve will notice the file edits and rebuild your site automatically. We won’t go through all the details of how to use Jekyll here, but there’s a good tutorial in the Jekyll documentation.
Type CTRL-C to stop the server.
Using jekyll serve is a convenient way to view your site during development, but it’s not how you should run it in production. In fact, as we shall see, you don’t need Jekyll, or even Ruby, installed at all in your final production container. So let’s explore how to create an efficient production image of your site.
Creating a production Docker image
Docker has become the de facto standard way to package applications for deployment, and Cloud Run conveniently uses Docker images as its input format. Here we’ll create a Docker image to deploy your site.
Our desired image will serve our static site directly from Nginx, a high-performance web server. It’s a static site, so we don’t need Jekyll or even Ruby at runtime. However, we do need Jekyll to build the static site. That is, building and running have different requirements, so we’re going to separate them into different phases, as diagrammed below.
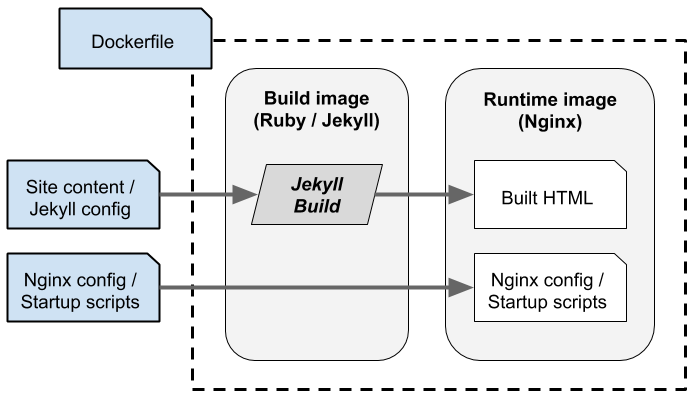
We will write the items in the blue boxes:
- Site content and Jekyll configs as inputs to Jekyll
- Nginx config files and startup scripts that launch Nginx with the correct configuration.
- A Dockerfile that describes the build process.
Then when we perform a docker build, it will proceed in two phases. First, the build phase runs, taking our blog posts and Jekyll configs, and running Jekyll to produce HTML output. Second, the built HTML, along with the Nginx configs and startup scripts, are installed into the runtime image.
Configuring Nginx
Inside our mysite directory, create a subdirectory called _app. This directory will contain our Nginx configuration files and startup script. Because it begins with an underscore, Jekyll won’t try to build it as part of your site html. It will just pass directly through into your final runtime image.
$ mkdir _app
$ cd _app
Let’s write the Nginx configuration. Create a file called _app/nginx.conf.in with the following content:
worker_processes 1;
working_directory /app;
daemon off;

events {
  worker_connections 80;
}

http {
  include /etc/nginx/mime.types;

  server {
    listen $PORT;
    root /app/site;

    location / {
      try_files $uri $uri.html $uri/ /404.html;
    }
  }
}
This isn’t an Nginx tutorial, so I won’t go over everything here in detail. However, I’ll point out a couple of things.
First, we intentionally set worker_connections to 80. Cloud Run currently has a maximum concurrency of 80 (meaning it will allow up to 80 simultaneous connections to each instance). Nginx can often handle more, but because Cloud Run currently has this limit, we’ll pass that info on to Nginx so it can optimize itself.
Second, notice that we’re listening to port $PORT. This is actually not “valid” Nginx config syntax by itself. Instead, we’re going to write a startup script that treats this Nginx config as a template, and substitutes the actual port number here at runtime. This is because Cloud Run’s runtime specification states that the port isn’t actually known until runtime: it will tell you what port to listen to via the PORT environment variable.
So our next task is to write a script that reads the environment variable and substitutes the correct value into the config template. Create a file called _app/start.sh with the following content:
#!/bin/bash

[[ -z "$PORT" ]] && export PORT=8080
envsubst '$PORT' < /app/nginx.conf.in > /app/nginx.conf

exec nginx -c /app/nginx.conf
Let’s pick apart what this is doing. First, it checks that the PORT variable is set, and if not, it sets it to a default value of 8080. Cloud Run always sets the variable, but we’re also going to test this image locally outside Cloud Run, so we’ll make sure it has a value in that case.
Next, we substitute the value of the PORT environment variable in the nginx.conf.in file, and write the result to the final nginx.conf that we’ll use. Finally, we start Nginx.
It’s important to tell envsubst to substitute only the PORT environment variable (because our Nginx configuration file also includes syntax like $uri that we want envsubst to leave alone.)
It’s also important to prefix our Nginx command with exec. This causes Nginx to replace the script process so that it receives signals. This is important for Cloud Run to be able to control the container effectively.
Save the two files, and set the execute bit on your start script:
$ chmod a+x start.shYou should now have the two files nginx.conf.in and start.sh inside the _app directory in your mysite project.
Writing the Dockerfile
Next we’re going to write a Dockerfile to build a Docker image of your site.
Go back to your mysite project directory, and create another subdirectory called _build. Again, because this name begins with an underscore, Jekyll won’t try to treat any of its files as site content.
$ cd /path/to/mysite
$ mkdir _build
$ cd _build
Create a file called _build/Dockerfile with the following content:
FROM ruby:2 AS build

RUN gem install bundler

WORKDIR /workspace
COPY Gemfile* /workspace/
RUN bundle install

COPY . /workspace
ENV JEKYLL_ENV=production
RUN bundle exec jekyll build


FROM nginx:1

WORKDIR /app
COPY _app /app
COPY --from=build /workspace/_site /app/site

CMD ["/app/start.sh"]
This may look a bit more complex than other “getting started” Dockerfiles you may have seen, so let’s take a closer look at what it’s doing.
Remember that our build process was going to proceed in two stages. You can see that now in this multi-stage Dockerfile. The first stage stage starts with the standard Ruby-Debian base image, installs your bundle (which should include Jekyll), and performs a production Jekyll build. The results are left in the /workspace/_site directory.
Then the second stage creates the final image that we will deploy to Cloud Run. It starts with the standard Nginx base image, copies in our Nginx config file and startup script, and also copies in the built html files from the first stage. Note that the final image includes only what is needed to serve your site: Nginx, but not Ruby or Jekyll. This two-stage strategy is a common best practice when building Docker images.
Testing your image locally
Now that we have a Dockerfile, we can build the image locally. Return to your mysite directory, and perform a docker build, pointing at our Dockerfile.
$ cd /path/to/mysite
$ docker build -t mysite -f _build/Dockerfile .
This will build your site as a Docker image and tag it with the name mysite. We can now try running it.
$ docker run --rm -it -p 8080:8080 mysiteThis will run your image with your static site, and expose port 8080. Now you can test it by pointing your web browser to localhost:8080.
Hit CTRL-C to stop your Docker image.
Deploying to Cloud Run
Now that we have a working Docker image, it’s time to deploy to Cloud Run.
Setting up Google Cloud
If you do not yet have a Google Cloud project, go to the console and create one. You’ll need to enable billing in order to use Cloud Run. But don’t worry—unless your site has a truly massive amount of traffic, you’ll easily fit into the free tier for this tutorial.
Enable Cloud Build and Cloud Run in your project, if you haven’t already:
- Navigate to Cloud Build in the console and click “Enable Cloud Build API”.
- Navigate to Cloud Run in the console and click “Start Using Cloud Run”.
You’ll also need the Google Cloud SDK installed. Set the default project as follows (substituting your project ID for $MY_PROJECT_ID)
$ gcloud config set project $MY_PROJECT_IDBuilding in the cloud
You could push a local image to the cloud in preparation to deploy to Cloud Run, but it is easier and safer to build in the cloud. We’ll create a simple configuration to build your site image in Google Cloud Build.
Create a file _build/cloudbuild.yaml. Copy the following into it:
steps:
  - name: 'gcr.io/cloud-builders/docker'
    args: ['build', '--no-cache', '--pull',
      '--file', '_build/Dockerfile',
      '--tag', '$_IMAGE',
      '.']

images:
  - '$_IMAGE'
This configuration performs a Docker build using the _build/Dockerfile you created, and tags it with an image name that you need to specify when you invoke the build.
Move back into the root directory for your Jekyll site, and build using this command (substituting your project ID for $MY_PROJECT_ID).
$ cd /path/to/mysite
$ gcloud builds submit --config _build/cloudbuild.yaml \
    --substitutions _IMAGE=gcr.io/$MY_PROJECT_ID/mysite:v1
This will build your site’s Docker image, and upload it to Google Container Registry. If you like, you can view your images by visiting your container registry in the cloud console. You can also view your build results and logs in the console.
The image name you provide as the value of _IMAGE should be of the form gcr.io/$MY_PROJECT_ID/$SITE_NAME:$TAG in order to upload to Google Container Registry. In that name, $MY_PROJECT_ID must be your project ID. $SITE_NAME should be some identifying name for this image. (We used mysite in this case.) $TAG should be a name for this build. (We used v1 here, but you might consider using a timestamp, git hash, or other system of generating build IDs.)
Deploying to Cloud Run
Now, to deploy to Cloud run, type this command (substituting your project ID for $MY_PROJECT_ID).
$ gcloud beta run deploy mysite \
    --platform managed --region us-central1 \
    --image gcr.io/$MY_PROJECT_ID/mysite:v1 \
    --allow-unauthenticated --concurrency 80
Unless you have a very large site, this should take only a few seconds. When deployment is done, the command will output your site’s URL. It will look something like https://mysite-somecode.a.run.app. Open that URL in your web browser to view your site.
If this is a real site, you’ll probably want to point your own domain at it. You can do this in the console. Go to the Cloud Run section and click “Manage custom domains”.
Deploying updates
When you have updates, you should repeat the build and run steps above. I recommend using a different $TAG for each update. This will let you identify each build uniquely, making it easy to roll your site forward and back as needed.
For example, our initial deployment used a tag of v1. Make some edits to your site (maybe add or edit a post), and test it out locally using jekyll serve. Then, let’s build v2:
$ gcloud builds submit --config _build/cloudbuild.yaml \
    --substitutions _IMAGE=gcr.io/$MY_PROJECT_ID/mysite:v2
$ gcloud beta run deploy mysite \
    --platform managed --region us-central1 \
    --image gcr.io/$MY_PROJECT_ID/mysite:v2 \
    --allow-unauthenticated --concurrency 80
As you work with your site, you’ll probably want to create a rake task or similar script to generate new tags and automate those commands. I use Toys for this purpose, and my .toys.rb file looks something like this:
LOCAL_IMAGE = "mysite"
PROJECT = "my-project-id"
SERVICE = "mysite"

tool "run-local" do
  flag :no_cache
  include :exec, exit_on_nonzero_status: true
  def run
    cache_args = no_cache ? ["--pull", "--no-cache"] : []
    exec ["docker", "build"] + cache_args +
         ["-t", LOCAL_IMAGE, "-f", "_build/Dockerfile", "."]
    puts "Running on http://localhost:8080"
    exec ["docker", "run", "--rm", "-it", "-p", "8080:8080", LOCAL_IMAGE]
  end
end

tool "deploy" do
  flag :tag, default: Time.new.strftime("%Y-%m-%d-%H%M%S")
  include :exec, exit_on_nonzero_status: true
  def run
    image = "gcr.io/#{PROJECT}/#{SERVICE}:#{tag}"
    exec ["gcloud", "builds", "submit", "--project", PROJECT,
          "--config", "_build/cloudbuild.yaml",
          "--substitutions", "_IMAGE=#{image}"]
    exec ["gcloud", "beta", "run", "deploy", SERVICE,
          "--project", PROJECT, "--platform", "managed",
          "--region", "us-central1", "--allow-unauthenticated",
          "--image", image, "--concurrency", "80"]
  end
end
Cleaning up
When you’re done with this tutorial, if you do not want to continue serving your site, you can delete the project so you do not incur any expenses related to it.
Note that deleting the project will delete all resources related to it, including any VMs, databases, storage, and networking resources. If you are still using some of the project’s resources and do not want to delete the entire project, you can clean up after this tutorial by doing this:
- Go to the Cloud Run console and delete the service you deployed for your site. (It might be called “mysite”.)
- Go to your container registry in the console and delete the images for your site.
Where to go from here
The Cloud Run documentation includes a lot of additional information about deploying and running your site. Of particular interest are:
- How to map a custom domain
- Setting up continuous deployment from Cloud Build and triggering on pushes to GitHub
- Monitoring your site
- Pricing and quotas.
For more information about the runtime environment, or if you want to customize your container further, you should refer to the container runtime contract.
There’s a lot of hype around serverless these days, and not all of it is justified. For me, Cloud Run is the first product I’ve actually been somewhat excited about, because of how it successfully fuses serverless with containers, and because of how well it works for common use cases such as static sites.